Don’t have Bricks Forge Yet?
Get Bricks Forge Today!Required Code:
//this is version 2 of this snippet. This code will work with select fields, radio fields, and multiple pick list fields.

function doPost(e) {

  // Get the active spreadsheet that this app script is attached to.
  var sheet = SpreadsheetApp.getActiveSheet();

  // Parsing the data received from the webhook
  var data = JSON.parse(e.postData.contents);

  // Function to handle array inputs (e.g., from multi-select lists)
  function processArray(value) {
    if (Array.isArray(value)) {
      return value.join(', '); // Joining the array elements with a comma and space
    }
    return value;
  }

  // Create an array of data parsed from the JSON, processing array inputs
  var row = [
    processArray(data.name),
    processArray(data.email),
    processArray(data.phone),
    processArray(data.message)
  ];

  // Append the array of JSON data to the spreadsheet
  sheet.appendRow(row);

  return ContentService.createTextOutput(JSON.stringify({result: "success"}))
    .setMimeType(ContentService.MimeType.JSON);
}
1. Navigate to Google Drive and create a new Google sheet
2. Double-click this text field to rename your spread sheet.

3. Type "Log Bricks Forge Form Submission" or something similar and hit enter.
4. Click "Extensions"

5. Click "Apps Script"

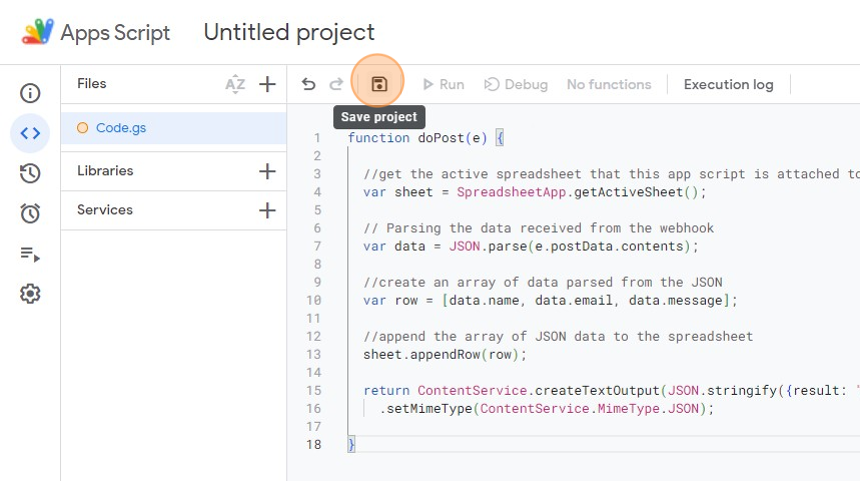
6. Click inside the code block and delete the existing function. You can select it all with the mouse or hit ctr+a and the hit delete.

7. Paste the code provided to you in the blog post or YouTube video description. Click the "save project" icon.
8. In the top right, click the "Deploy button."

9. Click "New deployment"

10. Click the gear icon next to the "Select Type" option and then select "Web app"

11. Click the "New description" field.

12. Type "Log Bricks Forge Form Submission"
13. The "Web app execute as" drop down should be set to the account you use to sign into Google. You should not have to edit this.
14. Click the "Who has access" drop down and change the value to "anyone" this is also shown in the next step.

15. Select "Anyone" and Click "Deploy"

16. Click "Authorize access"

17. Chose your account that you use to sign into Google.

18. Click "Allow."

19. Click "Copy" and save this some where safe. This will be the webhook URL you will use inside Bricks Forge.

20. Click "Done"

21. Head on over to your WordPress site and create a new page in Bricks Builder. You can choose to use a template or any existing page. We are going to build the form now.
22. Add a new section and container.
23. Add a new Bricks Forge Pro From and place it inside your new container.

24. Select the Pro Form to edit the settings

25. Click "ACTIONS"

26. Delete the email action for this example.

27. Add the Webhook" action

28. Click into the new "Webhook" action to edit the settings.

29. Click "Add Item"

30. Click the "URL" field and paste in the Web App URL from the Google Apps script. This was the URL we copied earlier and saved off somewhere safe.

31. Click the "Add Item" icon. Here we will be adding in our form fields.

32. Click the "Key" field and type "name" or whatever your form fields will be called.

33. Click add another item

34. Click the "Key" field and type "email"

35. Click add icon one last time.

36. Click the "Key" field and type "Message"

37. We are now going to grab the IDs from each field. So, Click the text field in the structure panel.

38. Click general in the settings panel for this field.
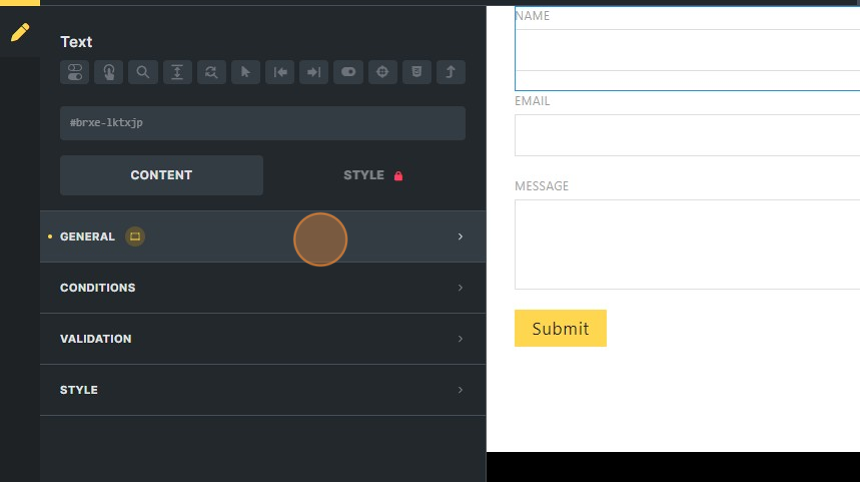
39. Copy the "Custom ID" field.

40. Go back to your Pro Form by clicking on it in the structure panel.

41. Go back into the Webhook settings.

42. Click the Webhook item (it will be the long URL)

43. Click the name field where we are mapping our field data to the Webhook.

44. Click the "Value" field and paste in the ID.

45. Repeat this process for the email field and the message field. All we are doing is mapping the key: value pairs for each field. The key is the name you want to call your field and the value is the field ID.
example:
name (key) : 8fsq3ww (ID)
email(key) : fre18ds(ID)
message (key) : 99uiiov(ID)
46. Click save. You’re done! Go submit the form and watch it populate in your Google Sheet.